Manufacturing and Distribution
 Firearms
 Automotive and OEMs
 Healthcare & Life Sciences
 Sports & Outdoor Hunting Gear
 Adobe Commerce
 BigCommerce
 Magento
 myMagento
 WooCommerce
 Shopify Plus
 Shopware
 Magento 1 to Magento 2 Migration
 Magento Upgrade Service
 Magento Design
 Magento B2B
 Magento Hosting
 Magento Consulting
 Magento eCommerce Developers
 Magento SEO
 Magento Integration
 Magento Speed & Performance Optimization
 eCommerce Development
 eCommerce GrowthX
 B2B CRO Services
 Enterprise SEO Services
 Email Marketing
 Website Localization Services
 Data Analytics Services
 GrowthX Strategy & Consultancy
 eCommerce Integration
 eCommerce Site Migrations
 Project Rescue
 Hire Developers
 Free Audit Report
 Extensions & Applications
 Custom Applications for eCommerce
 Magento Extensions
 User Interface & Experience
 Website Design Services
 Support & Maintenance
 About Us
 Blog
Blog Webinars
 News & Updates
 Downloads
 FAQs
FAQs The Wagento Difference
 Hyvä
Hyvä iPaaS
iPaaS Klaviyo
 Sales Layer
 Sift
Sift Dot Digital
 Nousmedis

Dive into the world of Hyvä Widgets with our comprehensive guide! Discover how these powerful tools can transform your Magento store, offering seamless integration, user-friendly designs, and enhanced functionality. Whether you’re a developer or a store owner, our guide on Hyvä Widgets will provide you with all the insights you need to elevate your online platform.
What are Hyvä Widgets?

Hyvä Widgets serve as a native feature within the Magento 2 platform. Their primary purpose is to offer users a streamlined CMS framework. This framework simplifies the process of prototyping and crafting pages within Magento’s familiar environment; thereby eliminating the need for extra tools or libraries.
Hyvä Widgets come prebuilt. This means users can easily tailor them or configure them. Configuration options include fields for color selection, dynamic listings of category products, uploading images, WYSIWYG, sliders, text input, and so on.
Users can directly embed Hyvä Widgets into CMS pages or incorporate them within containers using the Magento 2 admin layout tools.
How Hyvä Widgets Address Challenges?
CMS extensions, like PageBuilder, often come with numerous dependencies and boast robust functionality. This dual nature can be both an advantage and a drawback.
While these extensions provide end users with versatility, they also introduce unnecessary complexities for clients aiming for simple content changes. This excessive freedom sometimes disrupts the aesthetics of meticulously designed websites.
Hyvä Widgets strikes a balance by imposing just the right restrictions on content creators, ensuring they adhere to a website’s design system. Developers can harness these widgets as tools to craft custom content templates and swiftly construct custom layouts. All of this is achievable while leveraging the Hyvä Theme and the Tailwind/Alpine technologies.
By embracing native Magento 2 technologies, specifically the Magento 2 Widgets, the pitfalls of custom page builders are sidestepped. In essence, Hyvä Widgets champion simplicity and efficient content delivery.
Achieving Objectives with Hyvä Widgets

In the dynamic world of eCommerce, the tools you choose can make or break your online store’s user experience. Among the myriad of options available, Hyvä Widgets have emerged as a game-changer for those using the Magento 2 platform.
In this blog post, we’ll delve deep into how Hyvä Widgets accomplish their goals.
Seamless Integration with Magento 2
One of the standout features of Hyvä Widgets is their ability to seamlessly integrate with Magento 2. By harnessing native technologies, Hyvä Widgets ensure that users get a consistent and reliable experience. This deep integration means that store owners can trust the stability and performance of their widgets, knowing they’re built on a solid foundation.
Minimalistic Approach with Maximum Output
Hyvä Widgets stand out for their simplicity. Apart from the Hyvä Theme, these widgets operate without the need for additional dependencies. This minimalistic approach ensures that store owners and developers don’t have to grapple with unnecessary complexities. It’s all about getting the maximum output with minimal input.
Ready to Roll Right Out of the Box
One of the most appreciated features of Hyvä Widgets is their immediate functionality post-installation. There’s no tedious setup process or complicated configurations.
Moreover, developers have the liberty to customize the widgets as they see fit. Whether it’s utilizing the libraries provided for animations or replacing them with something else, Hyvä Widgets offer that flexibility.
Simply speaking, once installed, Hyvä Widgets are ready for use. Developers have the flexibility to utilize or replace the provided libraries for animations and sliders based on their preferences and client needs.
A User-Friendly Experience
Hyvä Widgets prioritize user experience. The intuitive design allows even those unfamiliar with Magento to make changes with ease. With a simple double-click, users can modify semantic fields, and these changes instantly reflect on the frontend. It’s all about making the process as straightforward as possible.
Basically, the design of Hyvä Widgets promotes ease of use. Users can simply double-click a widget and modify semantic fields, which then get reflected on the frontend.
Enhancing Functionality with Drag and Drop
To further simplify the user experience, Hyvä Widgets incorporate the native TinyMCE Drag and Drop functionality. This feature allows users to easily rearrange and organize their content, making page layouts more dynamic and engaging.
In the realm of eCommerce, user experience is considered paramount. Hence, tools like Hyvä Widgets play a crucial role. By offering a blend of simplicity, flexibility, and power, Hyvä Widgets have positioned themselves as an indispensable tool for Magento 2 users.
Whether you’re a seasoned developer or a store owner looking to enhance your site’s functionality, Hyvä Widgets are worth exploring.
How to Get Started with Hyvä Widgets?
Planning to get started with Hyvä Widgets? Well, before starting with the installation, do a quick check of the following pointers.
Compatibility
Remember Hyvä Widgets are compatible with Magento 2.4.3 or higher versions. So, if your store/site doesn’t support Magento 2.4.3, the widgets won’t be of any use.
Requirements
To use the Hyvä Widgets, look at the requirements checkbox. They are:
- Hyvä Themes version 1.1.10 or higher
- Magento 2.4.3 or higher
- Access to Hyvä Themes via Private Packagist
If these requirements are met, you are good with the installation of Hyvä Widgets.
Installation of Hyvä Widgets
Are you wondering how to install Hyvä Widgets? Follow this post to know more.
Well, In the ever-evolving landscape of eCommerce, ensuring that your website runs smoothly and efficiently is paramount. One tool that is creating ripples in the Magento community is the Hyvä Widgets.
Whether you’re a Hyvä license holder or a technology partner looking to contribute, this guide will walk you through the installation and configuration process of Hyvä Widgets.
Installing Hyvä Widgets
First, let’s take you through the process of installing Hyvä Widgets for license holders.
For Hyvä License Holders:
To get started with Hyvä Widgets, you’ll first need to install them. If you hold a Hyvä license, the process is straightforward:
- Open your terminal or command prompt.
- Use the composer to install the widgets with the following command:
composer require hyva-themes/magento2-hyva-widgets
Second, wondering what the installation process would be like for contributors and technology partners, then read on.
For Contributors and Technology Partners:
If you’re looking to contribute or if you’re a technology partner, the installation process requires a few more steps:
First, ensure you have access to Gitlab.
Second, before proceeding, set your public SSH key on your Gitlab profile.
Third, configure the composer using the commands below:
composer config repositories.hyva-themes/magento2-hyva-widgets vcs [email protected]:hyva-themes/magento2-hyva-widgets.git
composer require hyva-themes/magento2-hyva-widgets:dev-main
Enabling Hyvä Widgets
Now that you’ve installed the Hyvä Widgets, the next step is to enable them. For that, you will need to do the following:
Run the following commands to activate the Hyvä Widgets module:
bin/magento module:enable Hyva_Widgets
bin/magento setup:upgrade
Configuring Tailwind for Hyvä Widgets
In order to ensure that Hyvä Widgets integrate seamlessly with the theme, you’ll need to adjust the Tailwind Purge settings. For this, you will need to carry out the following steps. They are:
- First, navigate to the Tailwind configuration file located at ./app/design/frontend/[Your]/[Theme]/web/tailwind/tailwind.config.js
- Second, add the hyva-themes/magento-hyva-widgets module to the purge list configuration as shown:
purge: {
content: [
…
‘../../../../../../../vendor/hyva-themes/magento2-hyva-widgets/**/*.phtml’
]
}
Building Your Theme with Hyvä Widgets
Now that you plan to build your theme with Hyvä Widgets, it’s time to check if these changes are reflected on your website:
First, build the styles.css file by running the following command from the web/tailwind directory of your theme:
npm run build-prod
Final Configuration Tips
With Hyvä Widgets installed and configured, you can now insert these widgets in two ways. They are:
- Through the Admin section under Content > Widgets.
- Using a WYSIWYG editor or PageBuilder.
In a Nutshell
Hyvä Widgets offers a robust solution for those looking to enhance their Magento website’s functionality. By following this guide, you’ll have a seamless experience installing and configuring Hyvä Widgets, ensuring your e-commerce platform runs efficiently and effectively.
How to Play Around with Hyvä Widgets?
If you’ve ever wondered how to add cool features to your Magento website, you’re in the right place. Or do you want to create Widget Instances? Yes! Then read on!
Today, we’re going to help you get started with widgets.
Adding a New Widget
Here are the steps involved:
- First of all, log into your Magento Admin UI.

- Secondly, navigate to Content, then Pages, and pick a page like the Home page. Now, look out for the “Show/Hide” button and click it to see the Editor.
- Thirdly, you will need to click on an icon that says ‘Insert Widget’.
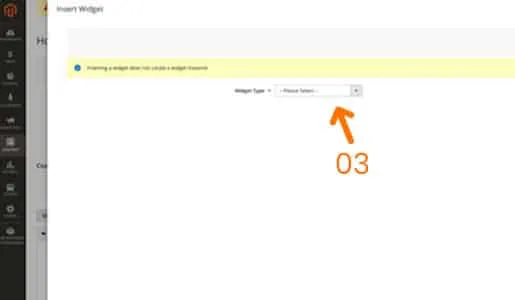
- Fourthly, you get to see a dropdown list. From the list, simply pick the Hyva content widget from it.
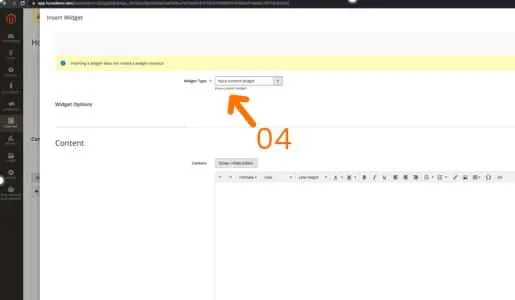
- Fifth, a box will pop up with a lot of choices for ‘Widget Options’.
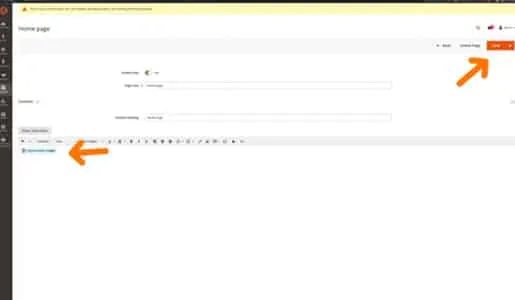
- Sixth, here you will need to make your choice. And when you’re done, click on “Insert Widget” at the top right. Don’t forget to save!
Making Sure Everyone Can See Your Changes
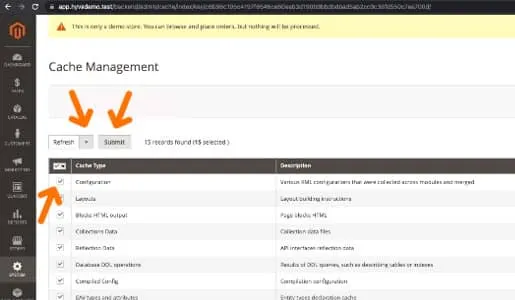
If your website is in a mode called “production mode”, you need to do one more thing. Wondering what you need to do?
You just need to simply click on Block HTML. Also, you must refresh the Full Page Cache.
Doing so will help to make the recent changes applicable to the storefront.
Now, you can safely navigate to your website’s main page. Now, you should be able to see the widget you just added!
For Those Who Love Building and Tweaking
If you’re someone who loves to build and change things, this section of the blog is just for you!
Where to Find the Module?
Wondering where to find the building blocks? Well, it’s pretty simple.
The Hyvä Widgets module is like a special box of tools. Hence, you can find it on your computer at:
vendor/hyva-themes/magento2-hyva-widgets/src
Understanding the Module’s Layout
This module follows just like other standard Hyvä module structures. So, if you want to see the main code, you will need to look in the src/ directory of the module.
What’s Inside the Module?
What are the folders present inside the module structure? And what are their roles? Read on!
The Block Folder
This folder comprises PHP block classes.
The etc Folder
Here, in this folder, the focus is on a special file called widget.xml file. This file shows how to set up different widgets. If you’re a developer and want to add a field or want to change something or want to add some more data, or even create more widgets depending on the blueprints, then this is where you start.
The Observer Folder
This folder has a solution to a small problem. It makes sure widget images have the right web addresses. In this folder, there’s an open issue with directives in Magento 2.
The Plugin Folder
There’s a fix here for a widget problem. Sometimes, widgets don’t show right because of certain symbols. However, the Hyvä team is looking into why this happens.
The ViewModel Folder
In fact, this is a special folder. This folder has a class named CategoryProducts that helps a certain widget. Basically, it is known for helping the category slider widget that shows products from chosen categories.
The view/frontend Folder
If you are a front-end developer, then this main folder will be of great value. It comprises two sub-folders. They are:
The templates Folder:
This is where you can decide how your widget looks. The designs use simple coding languages like JS, Tailwind, and Alpine. If you want to change a design, make a new folder called Hyva_Widgets/templates/widget/ and copy the design you want to change.
The web Folder:
This folder has a special code for a slider widget.
Well, this is a simple guide about Hyvä Widgets development module. Hopefully, you will be able to explore and make cool changes to your website!
Now that you have some fair idea about the Hyvä Widgets module, it’s time to look into the types of Hyvä Widgets available.
Types of Hyvä Widget?
As a proud partner of Hyvä, Wagento has identified four widget types of Hyvä. They are:
- Hyvä Multi Field Widget
- Hyvä Banner Widget
- Hyvä Category Products
- Hyvä Content Widget
Let’s delve deep into each one of these widgets in detail.
Hyvä Multi Field Widget
Let’s learn about Hyvä Multi Field Widgets.
Wondering, what’s a Hyvä Multi Field Widget? Imagine you have a magic box where you can put pictures, titles, and even buttons. That’s what the Hyvä Multi Field Widget is like! It’s a special tool you can use on your website.
Content Field: What Can You Put Inside This Widget?
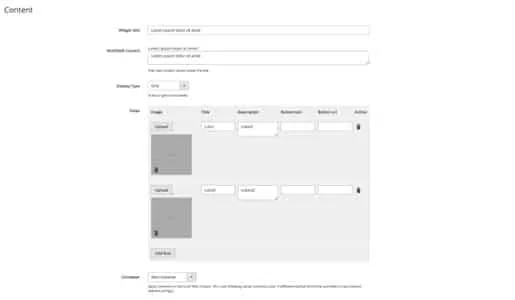
The ‘Content Field’ that one gets to see in this widget are:
- Widget Title: This is like a headline. It’s the big text that everyone sees first.
- Multi-field Data: Think of this as a small note or message you want to share.
- Display Type: You can choose how you want to show your items. Like a slide show or a grid.
- Steps: “Steps” are like little boxes you can use again and again on your website. Each box can hold different things. So, what can you put inside these steps? You can insert the following:
- Image: This is where you can pick and put a picture.
- Title: Here, you can write a big, bold name for your step.
- Description: This is a space to write a little more about your step.
- Button text: Want a button? Write what you want it to say here.
- Button url: This is like a magic door. When someone clicks the button, this is where they’ll go. It can be a page on your website like “/products” or another website like “https://hyva.io”.
- Action: This is a special button for you. If you don’t want a step anymore, click this to make it go away. But remember, after you remove a step, click “Save” so your website knows about the change.
Animations: Adding a Dash of Magic
Have you ever seen things move and change on a website as you scroll? That’s called an animation. Let’s learn about a special one called “Multi field fade animations.”
What Does It Do?
When you’re looking at a website and you scroll down, this animation makes content appear smoothly. And guess what? If you scroll away from that content, it will smoothly disappear too!
Choices, Choices!
You’re not stuck with just one style. There are 10 different ways the content can appear and disappear. That means you can pick the one you like the most!
Want to Know More?
For those who are curious about how this magic works behind the scenes, there’s a guide called the “Intersect plugin Alpine.js documentation.” It’s like a recipe book for website animations.
But do remember, animation works best with specific versions of Hyvä, such as Hyvä 1.1.10. Earlier releases of Hyvä do not include the x-intersect plugin.
Spacing: Making Things Look Nice
Now, let’s talk about two things: padding and margin.
Padding
This is like giving your widget a soft cushion inside. You can decide how thick you want the cushion to be on all sides. Basically, padding refers to the space inside an element.
Hyvä multifield padding allows you to adjust the space at the top, left, bottom, and right of an element. You can use settings like pt-8 pb-8 pl-4 pr-4 or py-6 px-8. You have the flexibility to choose more than one setting.
Margin
Margin deals with the space outside an element. It makes sure your widget doesn’t bump into other things on the website.
Hyvä multifield margin lets you select the amount of space you want at the top, left, bottom, and right of an element. Options like mt-8 mb-8 mr-4 ml-4 are available, and you can select multiple settings.
With this tool, you can make your website look super cool and fun. Give it a try and see what you can create!
For those who want to dive deeper, there’s another guide called “TailwindCSS Margin documentation” that tells you more.
Hyvä Banner Widget
Now, let’s take a look into the Hyvä Banner Widget and see what it’s all about!
What is the Hyvä Banner Widget?
The Hyvä Banner Widget is a tool that lets you add banners to your website. Banners are like big posters you see on websites. They can have pictures, words, and even buttons to click on!
Content Field to Make Banner
The ‘Content Field’ that one gets to see in this widget are:
- Banner Image: Pick a picture for your banner. Remember, big pictures might slow down your website.
- Image Width: Tell the computer how wide your picture is. This helps the picture fit just right.
- Image Height: Tell the computer how tall your picture is. This also helps the picture look good.
- Banner Title: Give your banner a name or headline.
- Banner Text: Write a short message or description for your banner.
- Button Name: Decide what your button should say, like “Click Me!”
- Button Link: Decide where the button should take people when they click on it.
- Text Position: Choose where your message should be: on the left, in the middle, or on the right. Usually, it’s on the left.
- Text Color: Pick a color for your message.
- Background Color: Choose a color for the area behind your message.
- Container: This is like a box where your banner sits. It uses a special size from the theme. If you want a different size, you’ll need to add a special setting.
- Inside Container: This is a smaller box inside the main one. It helps make the banner stretch across the screen. If you want it to be a different size, you’ll need another special setting.
Styling Your Banner
Here you will get the following options:
- Banner Layout: You can pick from three styles for your banner. They are:
- Full Width: This makes the banner stretch from one side of the screen to the other.
- Half Left Caption: The banner is split in two. Any words or messages will be on the left side, next to the picture.
- Half Right Caption: The banner is also split in two, but the words or messages will be on the right side, next to the picture.
- Shading: You can choose to have a see-through shade on your banner picture. This helps make sure the words stand out on the picture.
- Shading Color: If you pick shading, you can also choose its color
And that’s it! With the Hyvä Banner Widget, you can make your website look super cool.
Animations For Banner
When you scroll down a website, the banner can smoothly appear. And if you scroll past it, the banner can smoothly disappear. There are 10 different ways the banner can do this. If you want to know more about how this works, you can check the Intersect plugin Alpine.js guide.
Do keep in mind that animations will only work with the Hyvä 1.1.10 version. Earlier releases of the Hyvä do not have the x-intersect plugin; hence, it won’t work.
Banner Spacing Choices
With the Hyvä banner margin option, you can decide how much space you want around your banner. You can add space at the top, bottom, left, or right. For example, you might use settings like mt-8 mb-8 mr-4 ml-4. You can also choose other styles to make your banner look just right. If you need help with spacing or margins, there’s a guide called the TailwindCSS documentation for margins that explains more.
Hyvä Category Products
Hyvä offers a special widget called “Hyvä Category Products.” This widget lets merchants display products from a specific category on your website. Let’s dive into the features of this widget and see how you can use it effectively.
Content Field
The content field contains the following options. They are:
- Widget Title: This is the name you give to your widget.
- Content Editor: This is a special tool that lets you change how your content looks. You can make big headings, change the size of your text, and more. If you want to add some special designs, you can use free ones from tailwindcomponents.com. If you’re adding code, remember to hide the editor first and then show it again.
- Container: This helps you set the size of your widget content. If you need a different size, you can change it in your theme’s settings.
- Background Color: Pick a color for the background of your widget.
- Inside Spacing: This lets you decide how much space you want inside your widget. It helps make your content look neat and tidy.
Category Product List Options
Here you will get:
- Pick a Category: There’s a dropdown list that shows all the store categories by name and ID. When you pick one, the products from that category will show up on your website.
- How Many Products?: Decide how many products you want to show from the category you picked.
Animations: Making Your Content Move
When you scroll down a website, your content can smoothly show up. If you keep scrolling and move past the content, it can smoothly go away. You can pick from 10 different ways for this to happen. If you want to know more about how this works, there’s a guide called the Intersect plugin Alpine.js that can help.
Want to Know More? Well, if you’re curious about how this moving effect works, there’s a guide called the Intersect plugin Alpine.js that explains it.
Choosing How Your Widget Looks
You can choose how you want your content to look. There’s a box where you can pick from three styles: Hyvä Slider, Splide.js Slider, or Grid view.
Setting Up Space for Your Content
Here you will get the following options:
- Inside Space: You can decide how much space you want inside your content, like at the top, left, bottom, or right. Some examples are “pt-8 pb-8 pl-4 pr-4” or “py-6 px-8”. You can pick more than one style if you want.
- Outside Space: This lets you choose the space around your content, like at the top, left, bottom, or right. Some examples are “mt-8 mb-8 mr-4 ml-4”. Again, you can pick more than one style.
Hyvä Content Widget
This is the last Hyvä Widget that we are going to discuss in this blog.
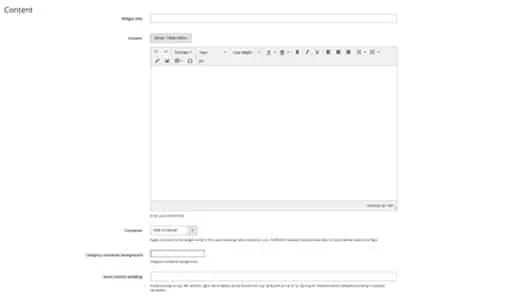
Content Field
However, in this widget, the content field comes with these two things. They are:
- Magic Editor: There’s a special tool called the WYSIWYG editor. It’s like a magic pen that lets you write and design at the same time. You can write big words, small words, and even add cool designs. If you’re copying and pasting something, remember to hide the editor. But if you want to see and use the magic pen, make sure to show the editor.
- Your Own Box: Think of a container as a box where you put your stuff. You can decide how big or small this box should be. If you want to change its size, you can do it in a special place called tailwind.config.js. If you’re curious about how to do this, there’s a guide called the TailwindCSS that can help.
Animations Making Things Move and Shine!
Moving Pictures: Imagine you’re reading a story, and as you move down the page, the pictures start to move! That’s what content fade animations do. When you’ve read halfway, the pictures start dancing.
But if you move past them, they hide away. You can pick from 10 different dance moves for your pictures. If you want to know the magic behind it, there’s a guide called Intersect plugin Alpine.js you can check out.
Pick a Color: Do you have a favorite color? You can use a special tool called a color picker to choose that color for the background of your widget. It’s like painting the walls of your room with your favorite shade!
Let’s Talk About Space!
Here you see two things:
- Inside Space: Think of “Hyvä content padding” as the space inside a picture frame. You can decide how much space you want at the top, bottom, left, and right of your picture. If you’re curious about how to do this, there’s a guide called TailwindCSS Padding you can look at. For example, you might see codes like “pt-8 pb-8 pl-4 pr-4” or “py-6 px-8”.
- Outside Space: Now, “Hyvä content margin” is like the space around the picture frame. It’s the gap between your frame and the wall. You can also decide how much space you want around your frame. There’s another guide called TailwindCSS Margin that can help you understand this better. Some examples are “mt-8 mb-8 mr-4 ml-4”.
Text Font Color
The widget lets you pick the color of your text. This feature works best when you’re using the visual editor, not when you’re pasting in raw HTML.
The Hyvä Content Widget is a versatile tool that can enhance the look and feel of your website. With its user-friendly editor, customizable design options, and cool animations, it’s a must-have for anyone using the Hyvä platform. So, why not give it a try and see how it can transform your site’s content?
Conclusion
Do you want to achieve excellent speed and performance for your Magento store with Hyvä? You are in the right place. We, Wagento are a proud partner of Hyvä and can help you to leverage the full potential of your Magento stores with the right widgets. Do give us a call and allow us to integrate any Hyvä Widgets to your store.